
Xiaomi Redmi Note 9 Pro Max Introduction
Xiaomi Redmi Note 9 Pro Max is a popular premium mid-segment smartphone. It comes with a 6.67-inch display with FHD+ resolution. It is protected by the Corning Gorilla glass on the front and back. The maximum brightness is 450 nits. The primary camera is of 64MP. There is also an ultra-wide 8MP sensor and a 5MP macro camera. The front camera is of 32MP.
The current article provides details of how to root Redmi Note 9 Pro Max and related details.
What is Rooting?
Rooting your Android smartphone is a process that allows you to get access to the phone’s root directory. It gives you administrator controls and privileges over your phone which is not the case with an unrooted smartphone. You can install custom ROMs and the latest version of the Android operating system on a rooted smartphone. It also allows you to install custom skins and UI, thereby changing the complete look and feel of your phone. You can have deeper controls over the functioning of your phone. You can increase the processing speed by overclocking the processor. It also lets you get a better battery life by underclocking the processor. A rooted smartphone also allows you to delete pre-installed apps. This will help in clearing the phone’s internal memory and thus provide a smoother and snappier end-user experience.
How to Root Xiaomi Redmi Note 9 Pro Max
The process for rooting Redmi Note 9 Pro Max smartphone is discussed below:
Steps to Root Xiaomi Redmi Note 9 Pro Max via Magisk
- Copy the Magisk.zip and disableforceencryption.zip files to the internal storage of your phone.
- Turn off your phone by pressing the power key.
- Wait for a few seconds and reboot the phone by pressing the power key and volume up key at the same time.
- Once the logo appears on the screen, let go of all keys.
- The phone will now reboot in the TWRP recovery mode.
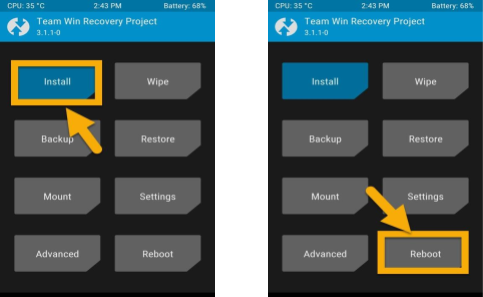
- Press the “Install” button.
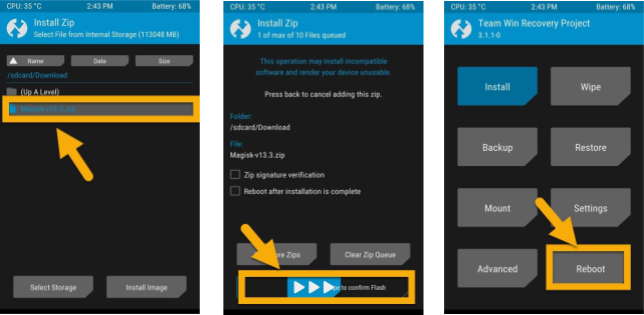
- Select the disableforceencryption.zip file saved on the phone’s internal storage.
- Tap on the “Swipe to Confirm Flash” tab.
- Wait till the flashing completes and press the “Reboot” button.
- Reboot your Redmi Note 9 Pro Max in TWRP recovery mode again by pressing the power and volume up key at the same time.
- Click on the “Install” button.
- Select the Magisk.zip file extracted to the phone’s internal memory.
- Tap on the “Swipe to Confirm Flash” and wait for the flashing process to complete.
- Click on the “Reboot” button.
- Once your phone reboots, the rooting process is completed.
Considerations Before Rooting the Phone
You should know the process of rooting an Android smartphone. it is a technical and complex process that may damage your phone also. And root your Redmi Note 9 Pro Max only if you know the rooting process. You should also ensure that the phone’s battery has enough charge to last till the rooting is complete. If the battery runs out before the rooting is completed, it can severely damage your phone. in some cases, the damage may be irreparable. Click here for How to root Redmi Note 10 Pro.
You should also take a data backup of your phone before rooting it. There are chances that the phone’s user data may be lost while rooting it. You can lose valuable data stored on your smartphone if you do not take backup. Taking backup also helps to restore the phone to its pre-rooting status. You can take the data backup on the cloud or hard disks.
Download Stock ROM and Extract the Boot Image
You can download the ADB and fast boot files and save it to your computer. You should also install the latest Xiaomi USB drivers. It is also recommended to download the latest Redmi Note 9 Pro Max stock ROM.
Unlock Xiaomi Redmi Note 9 Pro Max Bootloader using ADB and Fastboot
You should follow the below-mentioned steps for unlocking Redmi Note 9 Pro Max bootloader using ADB and fast boot:
- Visit the official Mi Bootloader Unlock website.
- Log in with your Mi account.
- You will need to enter details like your phone number, IMEI, reason, etc. Once done, you will get a confirmation code on your phone.
- Enter the confirmation code on the Mi website and request for unlocking. Once the unlocking is approved, you will get a confirmation email within 2-10 days.
- Install the Mi flash tool from the email received. You need to log in with the same Mi account which was used to get the software.
- Press the power key and switch off the phone.
- Connect the phone to your computer using a USB data cable.
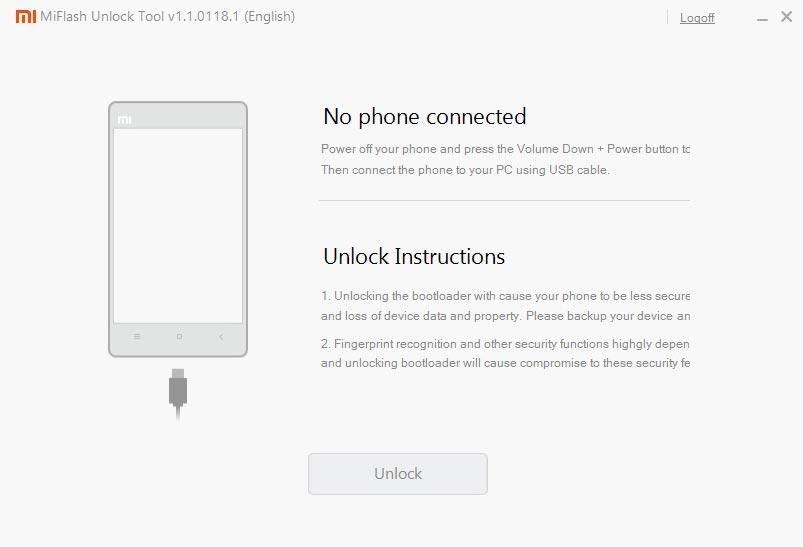
- Press the volume down key and power key at the same time to reboot the smartphone.
- Once the Mi logo appears on the screen, release all the keys immediately.
- Your phone will now boot into fast boot mode.
- Once the phone boots into fast boot mode, select unlock. The unlocking process will take a few minutes to complete.
- Reboot the phone after the successful completion of the unlocking process.
How to Extract and Patch Boot Image using Magisk?
You should follow the below-mentioned steps to extract and patch boot image using Magisk:
- Download the ROM and extract it to your computer.
- Attach the smartphone to your computer using a USB data cable.
- Copy the boot.img file from the extracted folder on your computer to your phone’s internal storage.
- Install the Magisk Manager app on your Redmi Note 9 Pro Max.
- Open the app and click on the “Install” button, placed next to the Magisk status.
- The next menu will appear. Select the “Install” option again in it.
- In the next menu choose “Select and Patch a File”.
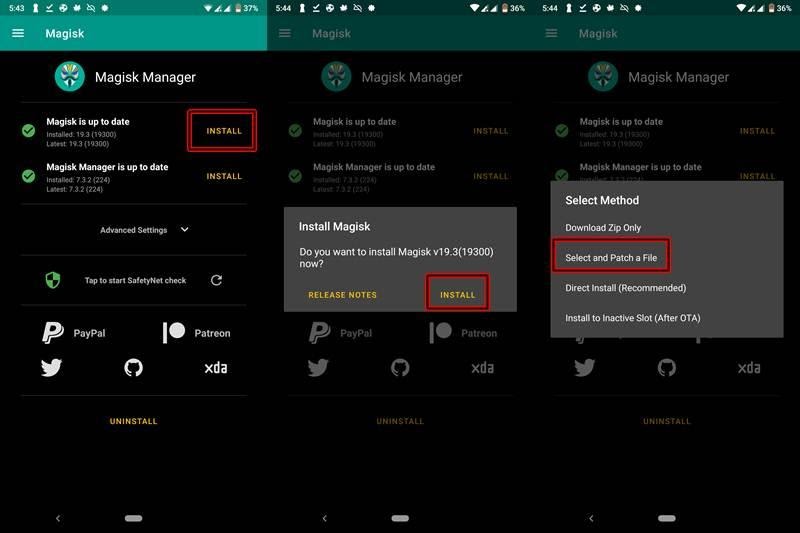
- Browse the phone’s internal storage and select the boot.img file extracted from your computer.
- Wait for a few seconds. Magisk Manager app will now start patching the boot image.
- Once the boot image has been patched, copy the “patched_boot.img” file from the phone’s internal storage. Replace this file in the ADB fast boot extracted ROM folder on your computer.
- The process of extracting and patching boot image using the Magisk Manager app is complete.
How to Install the Patched Boot Image on Redmi Note 9 Pro Max
The following steps will help you install the patched boot image on Redmi Note 9 Pro Max smartphone:
- Connect your phone with a PC using a USB data cable.
- Transfer the patched boot file to the “ADB And Fastboot” folder on your computer.
- Right-click inside this folder pressing the Shift key.
- Select the “Open PowerShell Window Here” option in the dialog box.
- The command prompt will open. Type the command “ADB devices” to ensure that the device is successfully connected. An alpha-numeric code denotes a successful connection.
- Type the command “ADB reboot bootloader” to boot the phone to fast boot/bootloader mode.
- Type the command “fast boot flash boot magisk_patched.img” to flash the patched image file.
- Now reboot your smartphone by entering the command “fast boot reboot”.
- Once the device reboots, you can open the Magisk app to check if the installation is successful.
How to Verify if the Rooting is Successfully Done?
You can use the Magisk Manager app to verify if rooting Redmi Note 9 Pro Max has been successfully done. Launch the app and check the top of the screen. If you can see all options with a green tick, it means the rooting is successfully done.
How to Uninstall Magisk From Your Smartphone?
In addition to rooting your smartphone, the Magisk Manager app allows you to perform various tasks for customizing the software. It is one of the most feature-loaded apps for rooting an Android smartphone. It can be installed on any Android smartphone. Magisk Hide is another important feature that allows you to hide root from apps that might not work on a rooted smartphone.
You may want to uninstall Magisk and unroot your smartphone. Before uninstalling the Magisk Manager app, you should disable and remove all the modules. The process for the same is discussed below:
- Launch the Magisk Manager app on your smartphone.
- Click on the “Uninstall” option on the main screen.
- The uninstall prompt should appear on the phone’s screen.
- Click on the “Complete Uninstall” option in the prompt box.
- This will completely uninstall the Magisk Manager app from your smartphone.
- Once your phone reboots, the Magisk Manager app will be uninstalled.
Conclusion
Rooting an Android phone can unlock new features and functionalities. It can help you extract more from your smartphone. However, there are risks associated with rooting Redmi Note 9 Pro Max too. You can lose the phone’s warranty and may even end up with a damaged phone. You may not need the customization offered by rooting like overclocking or underclocking the processor, installing custom ROMs, the latest version of Android, etc. If you do not need these functionalities, then you may avoid rooting your phone.
On the other hand, if you have the technical knowledge and want the best form of your Android smartphone, then rooting is recommended for you. You should assess the pros and cons of rooting your smartphone and decide whether it works for you or not.